How to convert DVD to video with Bennse DVD Converter
iSofter DVD Converter is a DVD converter that can convert DVD to MP4, AVI, etc. You can convert DVD to video files and save them on your computer, convert DVD to iPhone, iPad, and Android smartphones.
Here we will show you how to use Bennse DVD Converter to directly convert DVD to AVI, MP4, WMV, etc. video files and save them on your computer, how to convert DVD to iPhone, iPad, and how to import DVD to your smartphone.
First, click the link below to download the free trial version.
Free Trial Download:iSofter DVD Ripper
Table of Contents
1.How to convert DVD to video and save it on your computer
STEP1: Download the software
First, download and install “Bennse DVD Converter” from the download link above.
After the installation is completed, double click the icon on the desktop to launch “Bennse DVD Converter”.
STEP2: Load DVD disc
Insert the DVD disc to be converted into the drive.
Click the “Add” button on the toolbar or select “File” -> “Select DVD Drive” from the main menu to load a DVD.
The DVD will appear in the task list by title. You can play it in the preview window on the right.

STEP3: Set output file format
Click the “Profile” drop-down button to select your desired output file format.
You can rip DVD to almost all video formats including AVI, MP4, WMV, FLV, 3GP, MPEG, MOV, etc.

STEP4: Set the destination
Click the button on the right side of “Output Destination” to specify the folder where you want to save the converted video files from DVD.

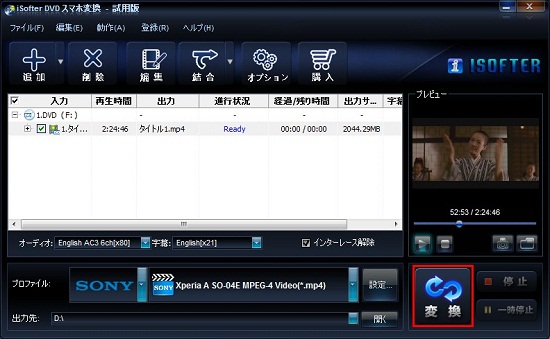
STEP5: Start DVD Conversion
When you are ready to convert the DVD, click the “Convert” button to convert the DVD to the video format you have just set.

With the above operations, you can convert DVD to AVI, MP4, WMV, and other video files and import them to your computer.
In addition to the DVD converting function, “Bennse DVD Converter” also has other useful usages, which are introduced in the following sections.
How to import DVD to iPhone and watch DVD on iPhone
Launch Bennse DVD Converter and insert a DVD into the drive.
Select your iPhone model directly from the “Profile” drop-down list.
If you have an iPhone 7 or later, please set the output format to the common iPhone-H.264 Video Format (*.mp4). This format is compatible with all iPhone models up to the latest iPhone 12 series.

Click the button to the right of “Output Destination” and specify the folder where you want to save the converted DVD to iPhone video.
If you are not particular about the destination, you can leave it as the default.

When you are ready to convert the DVD, click the “Convert” button in the lower right corner to convert the DVD for iPhone.

You have now completed the process of converting DVDs to iPhone. Now wait until the conversion is complete! The conversion time depends on the specifications of your computer. Please run the program in the background and do other work.
After the conversion is complete, the destination folder will automatically open. Play the converted video once on your computer to check if the conversion was successful. If the conversion is successful, the next step is to import the converted DVD video to your iPhone.
After the conversion is complete, drag and drop the converted video into iTunes.
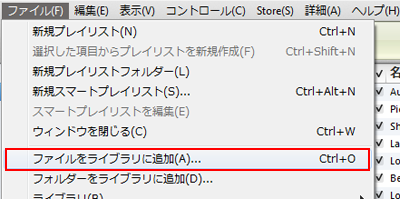
Or, click “File” -> “Add File to Library” to import the converted video to iTunes.
First, connect the iPhone to the computer.

Click on “iPhone” in the “Devices” section of iTunes and select the “Movies” tag.

Check the “Sync Movies” checkbox and select the movies you want to put on your iPhone.

Click the “Apply” button.

With the above steps, you can import DVDs to iPhone, and when you want to watch a DVD on iPhone, you can play it on iPhone's Video app. You can watch your favorite DVD movies on your iPhone anytime and anywhere, even on the train while commuting to work or school.
3.How to import DVD to iPad and watch DVD on iPad
Next, we will explain how to import DVD to iPad. The procedure is almost the same as how to import DVD to iPhone.
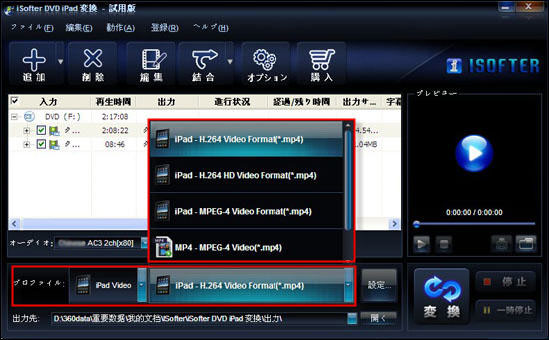
Select the DVD video you want to import to your iPad, and click the “Profile” drop-down button to set the desired iPad format as the output file format. All iPad models are supported, from the original iPad to the latest 4th generation iPad, iPad Air, and iPad mini.
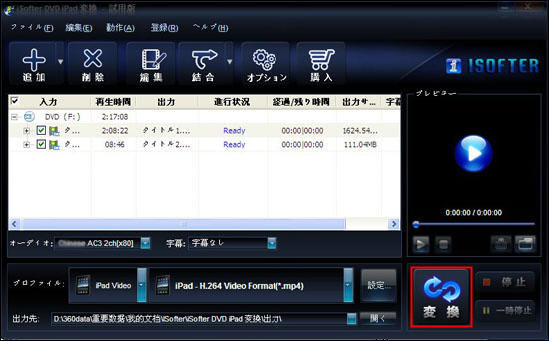
After completing the above settings, click the “Convert” button to convert DVD for iPad.
Now that you have converted DVDs for the iPad, the next step is to put the converted videos into your iPad via iTunes.
After converting DVD to iPad, launch iTunes.
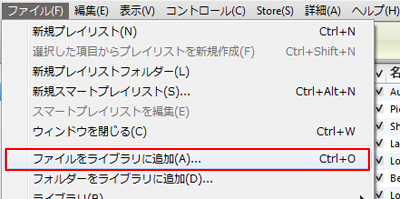
D&D the converted video into iTunes “Movies” or click “File” -> “Add File to Library” to add it.
Select the video in iTunes and click the “Apply” button to sync with the iPad.

With the above operations, you can import DVDs to your iPad and watch DVDs on your iPad anytime, anywhere.
Please use it to kill time on a business trip or on a moving train.
4.How to import DVDs to your smartphone
The process is almost the same as converting DVDs to iPhoneiPad. Since Android phones work differently than iPhones, the process of importing the converted DVD video to your phone is different.
Select the DVD video and click the “Profile” drop-down button to select the manufacturer and specific model of your smartphone.
Most popular models are supported, including Sony Xperia, Fujitsu Arrows, Samsung Galaxy, etc.
If you still can't find a compatible model, we also offer a smartphone common video format.
If you set the output format to “Smartphone Common,” you can play the converted video on most smartphones.
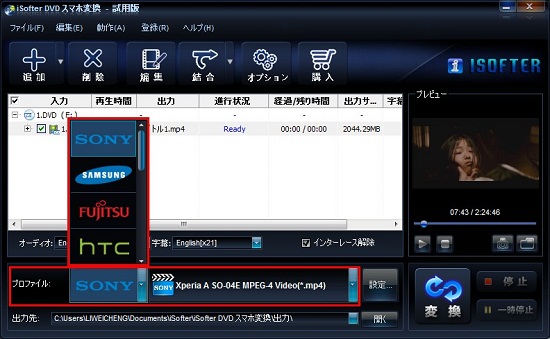
When the above settings are complete, click the “Convert” button to convert the DVD to a video file for your smartphone.
After the conversion is complete, the destination folder will automatically open.
The converted video file format is MP4, and you should confirm that it can be played on your computer normally! From here, you can start the process of putting the converted DVD video into your smartphone.
Transfer the MP4 video you were able to convert from DVD to your smartphone's internal storage or external SD card.
First, connect your Android smartphone to your computer using a USB cable. Once recognized by the computer, you will see the model name of your smartphone in “My Computer”.

Double-click the model name. Two folders will appear: the main unit storage and the SD card.

To put DVD movies on the SD card, click on the SD card folder to open it. Inside it, locate the “movie” video folder. *Please try to save DVD videos to the SD card as much as possible, as the storage capacity of the device is limited and there are various applications on it.
*When using an SD card in a smartphone, you may accidentally delete photos or videos stored on the MicroSD card, or the “SD card is corrupted” message may appear and they cannot be read. In such cases, you can use data recovery software to recover the data with a high probability. For details, please refer to “SD Card Recovery/Recovery Methods”.

Move DVD videos by dragging them directly to the “movie” folder or by copying and pasting.

If your model does not have an SD card, or if you are not using an SD card, put the DVD video into your smartphone's body storage. To do so, click on the body storage folder and open it. Locate the video folder called “Video.

Move the DVD video from its original storage location to the “Video” folder.

The process of putting a DVD into your smartphone is now complete. You can play it on your smartphone's video app, so you can watch your favorite DVDs on your smartphone anytime, anywhere. In addition to the function of converting DVDs to smartphones, “iSofter DVD to Smartphone Converter” also has a full range of video editing functions. Here are some of them.
DVD video editing and other useful functions
Tips1: Parameter Setting
Before converting DVD, you can set parameters such as video resolution, frame rate, bit rate, codec, and audio sample rate, channels, bit rate, codec, etc. If you want to customize the output parameters, click the “Settings” button on the right side of “Profile”.

Tips2: Merging videos
To merge video files, select the files you wish to merge and click “Merge selected files” from the “Merge” drop-down list. If you want to merge all files, click “Merge All Files”.

Tips3: Video Editing
In addition to the main DVD converting function, “Bennse to DVD Converter” also provides video editing functions. If you want to edit your video, select the file you want to edit and click the “Edit” button on the toolbar. You can edit the video with the editing functions such as video cutting, cropping, color correction, brightness adjustment, video rotation/flipping, watermark text/image insertion, etc.
With the above operations, you can convert DVD to video file and save it on your computer.
- Products
-
Data RecoveryVideo ConvereterVideo Maker
sd card recovery | MP4 compression | MP4 to MP3 Converter | MP4 Converter | PhoneRescue for iOS | phonerescue for android | Anytrans
Terms of Use | Privacy Policy | Contact Us | Link | Sitmaps
Copyright ©2024iSofter Co.,Limited All rights reserved.

